Dashboard
Overview
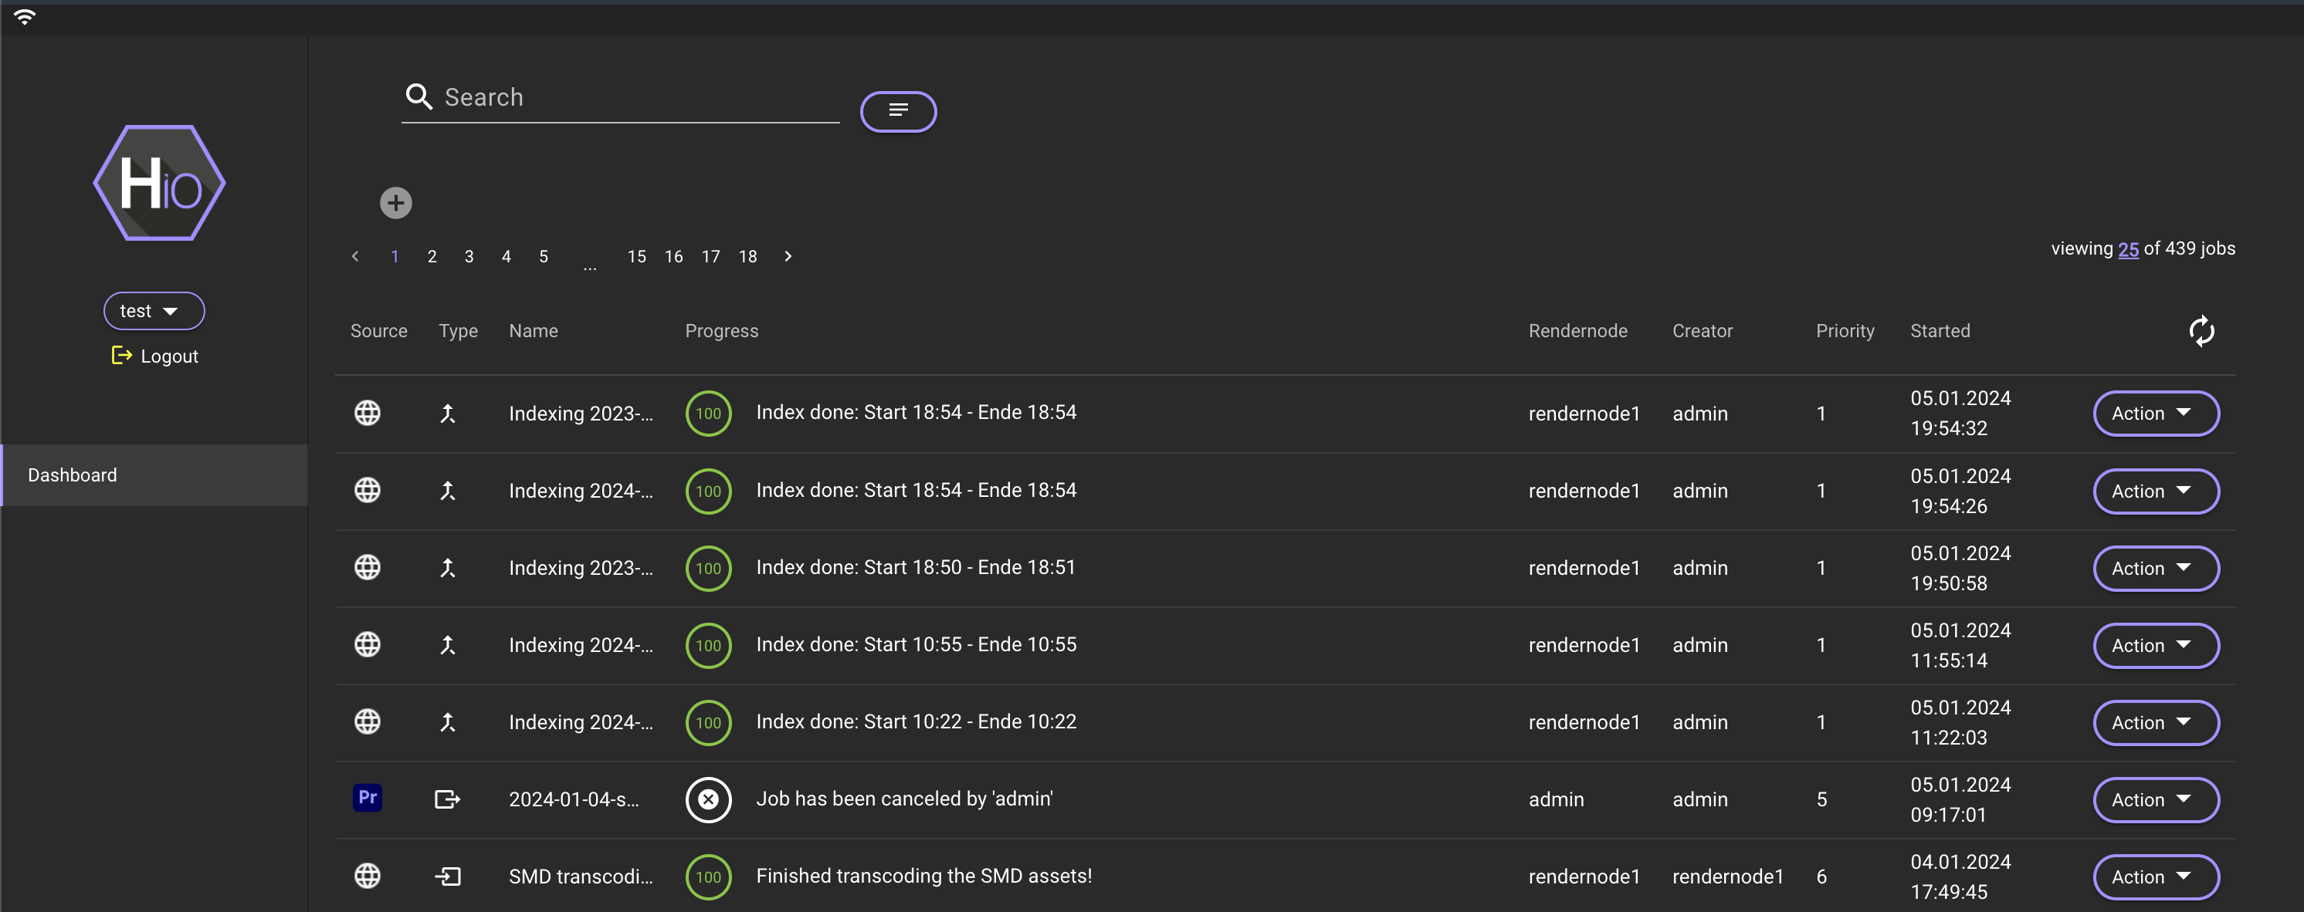
After successfully logging into the IO, CO, or HK module, the dashboard view will be displayed by default (logging into FX will show the projects view instead).
All jobs, whether they are running, completed, failed, or queued, and are related to any groups the user belongs to, are displayed here. The subdivision of the jobs is based on their source (e.g., Premiere Pro, After Effects, IO, CO, ...) and type (e.g., Autoimport, Export, Archive, ...).
The dashboard list view can be filtered by various sources such as types, progress, render node, and so on, by simply clicking on the corresponding icon or text field.
The list displays 25 entries per page, a quantity that is adjustable. Users have the flexibility to choose individual or multiple jobs (achieved by holding the shift or command key) and execute actions on the selected jobs. Only action options applicable to all selected jobs are presented.
For instance, if a user selects a "queued" job and a "canceled" job simultaneously, the "cancel" action cannot be performed due to one of the two jobs already being canceled. This is indicated by the red color of the action and a tooltip. Moreover, only actions authorized by the user are displayed.
Dashboard Function
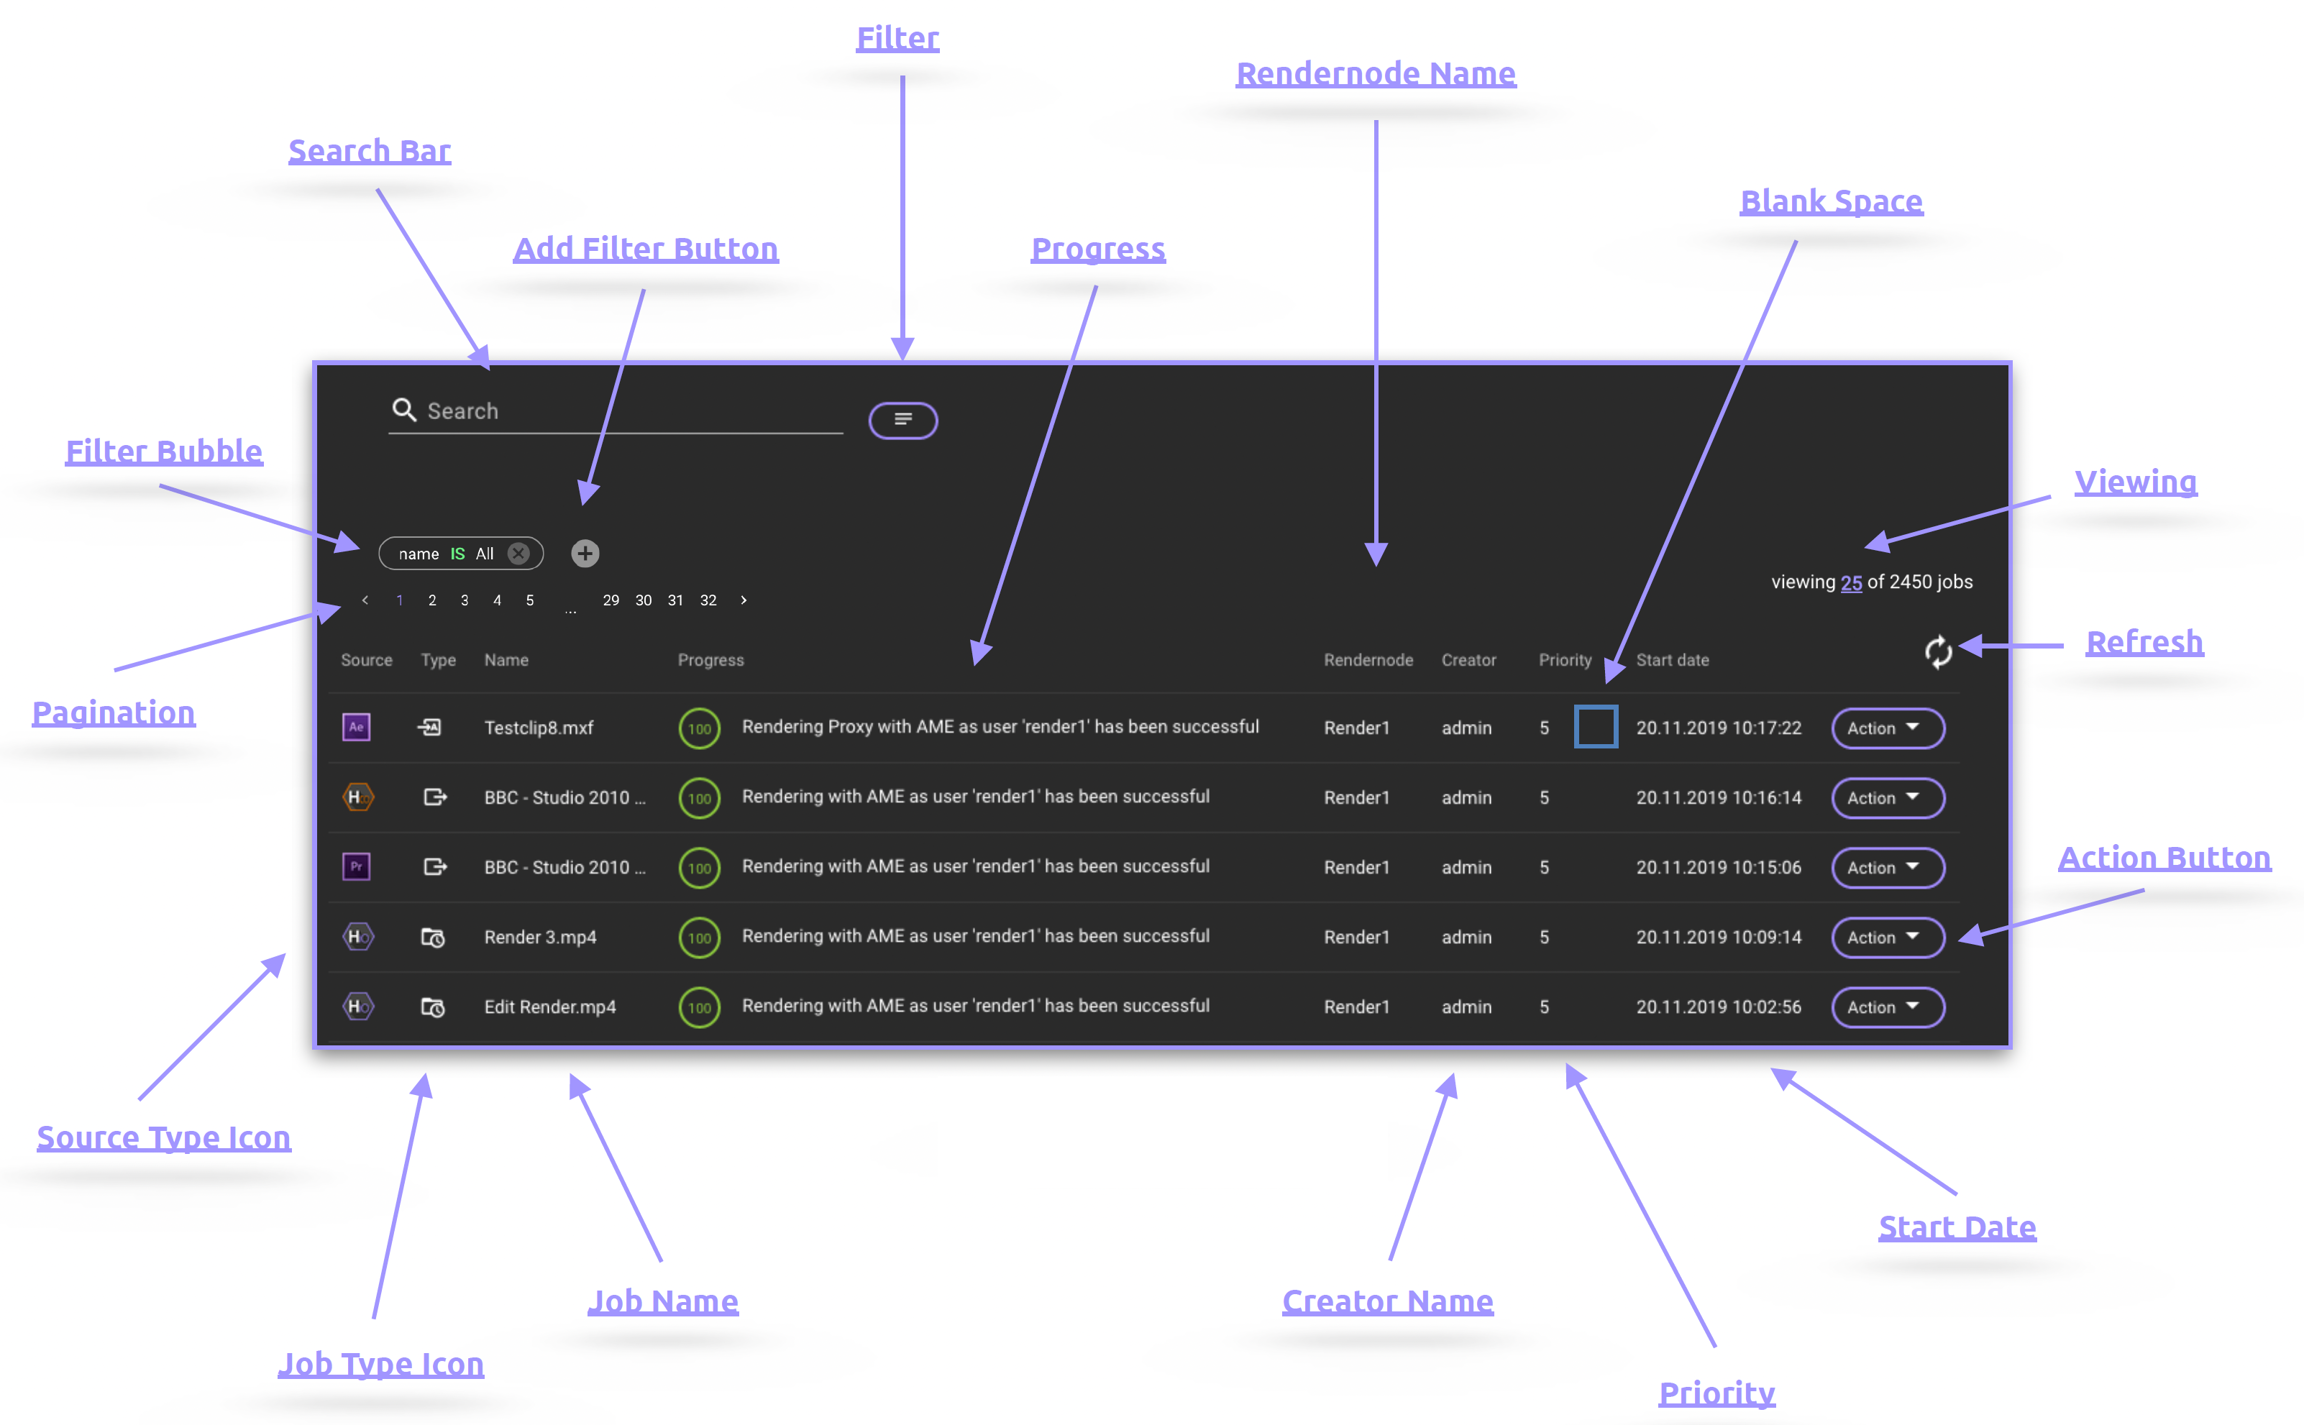
Search Bar
The search bar is designed for free-text searches, allowing users to input text directly. The search is conducted in real-time and automatically generates a filter bubble. Any input in the search bar is used to search for potential matches by comparing it to the job name and progress/job status.
Advanced searches can be configured using filter bubbles.
If a filter bubble is activated, the search will automatically be conducted within the list generated by the filter.
Filter Button
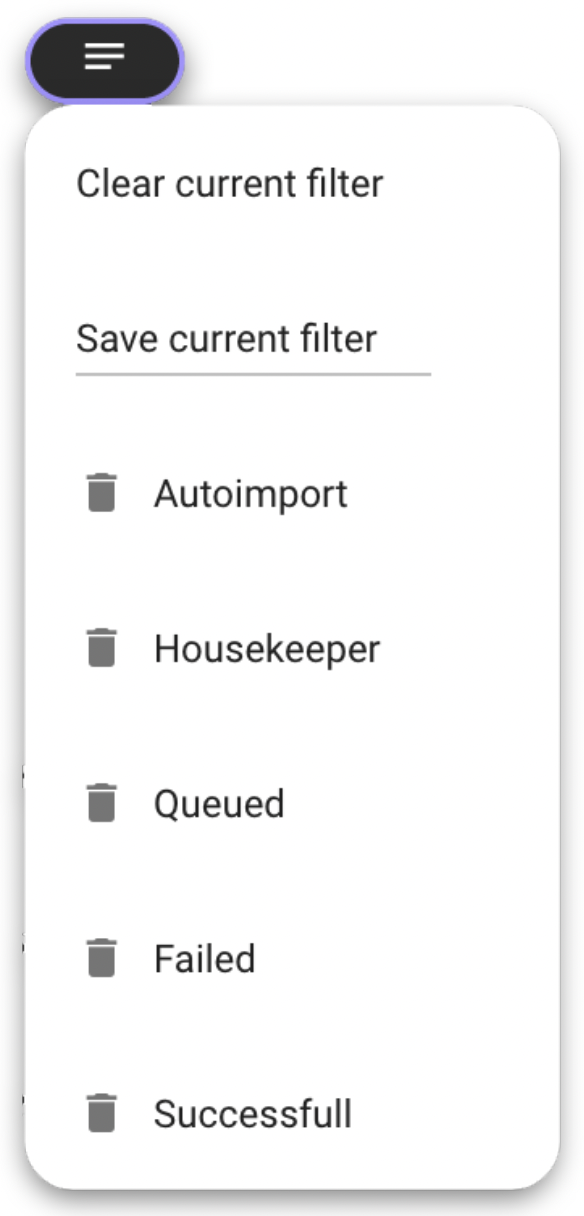
The filter button enables users to effortlessly navigate through filter bubbles.
Users can create and save their customized sets of filters, assigning them dedicated names, such as "My Jobs," for easy recall when using a search filter.
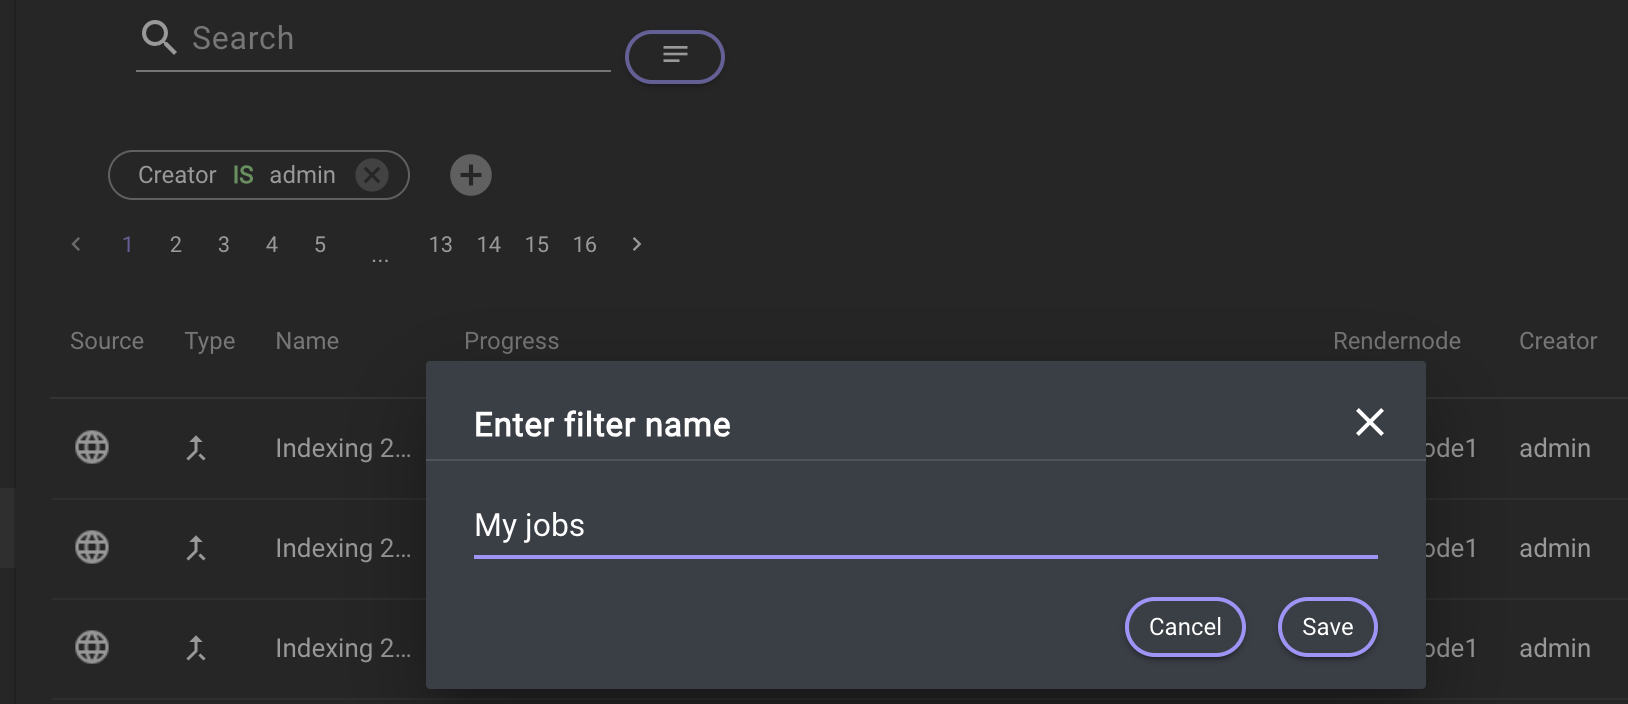
Please note that filters are restricted to individual users, and there is no option to distribute filters globally to all users. Additionally, users have the ability to clear any currently applied filter bubbles, which are utilized to display specific jobs, and delete previously saved user search filters.
Filter Bubble
A filter bubble can be created by clicking on a metadata entry in the job overview or by clicking on a metadata entry in the hidden overlay. Clicking on the filter bubble itself opens a dialog for editing.
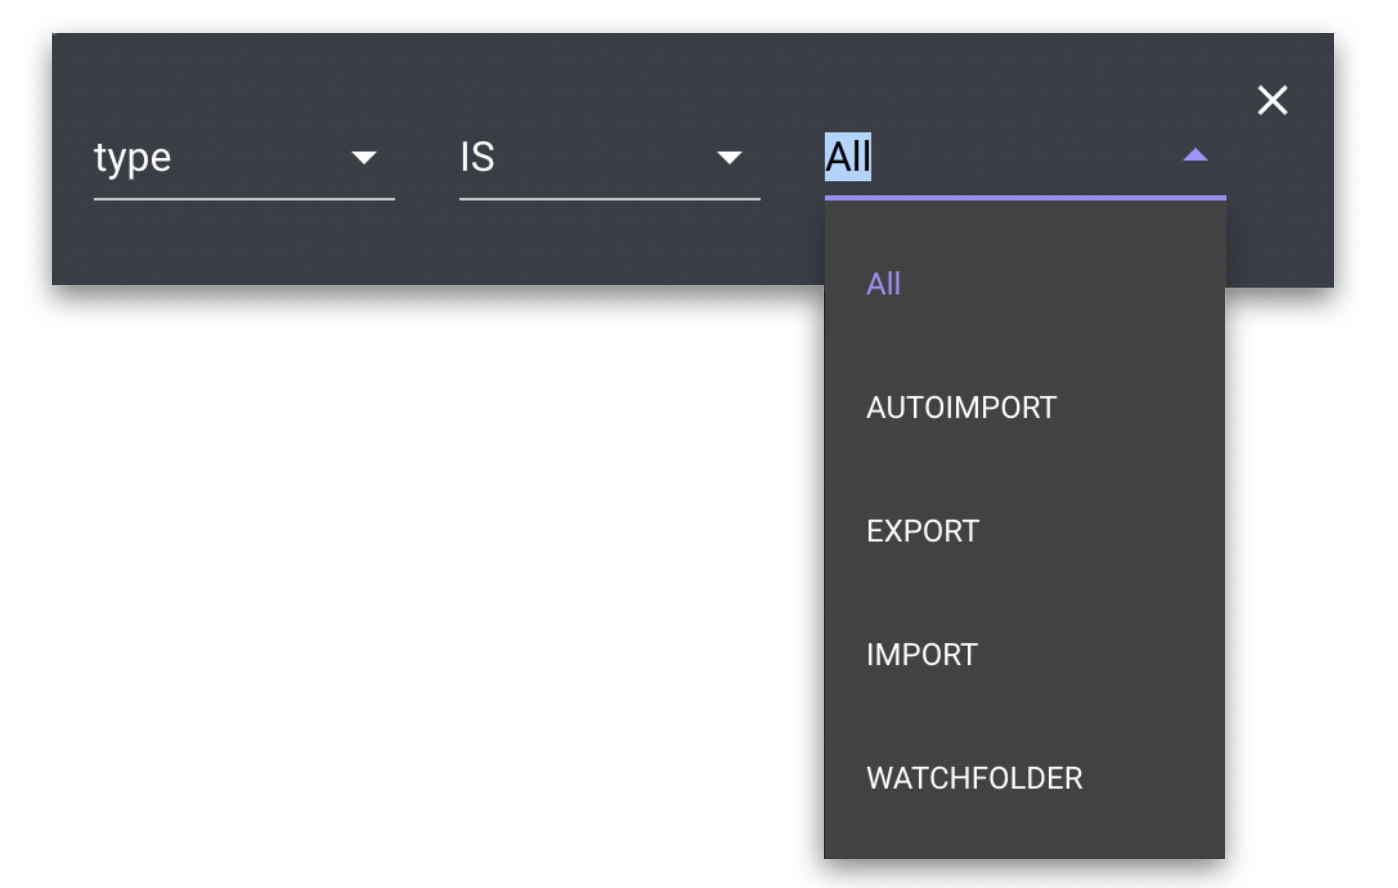
Filter bubbles enable searching for various information in the dashboard overview, including Name, Tag, Group, Category, Template, Modified, Modified by, Creator, and Metadata.
Add Filter Button
Enables the creation of a new filter/search bubble to identify matching jobs.
Progress Bar / Job Status
This feature illustrates the progress of each job node within the stream on which the job is based, and these are set using the Job Status Update Action node.
The progress graphs appear sequentially and overwrite one another. For instance, if a job involves copying, transcoding, and quality control in that order, three consecutive progress graphs will be presented.
Alongside each progress graph, the dedicated job status text, established by a Job Status Update Action node, will be displayed.

Render Node Name
The name of the render node or client that is processing the job is shown.
Blank Space - Detailed Job Menu
The empty space can be clicked to reveal the hidden overlay and clicked again to conceal it.
The overlay menu displays various job-related information such as the source, type, job metadata, and more.
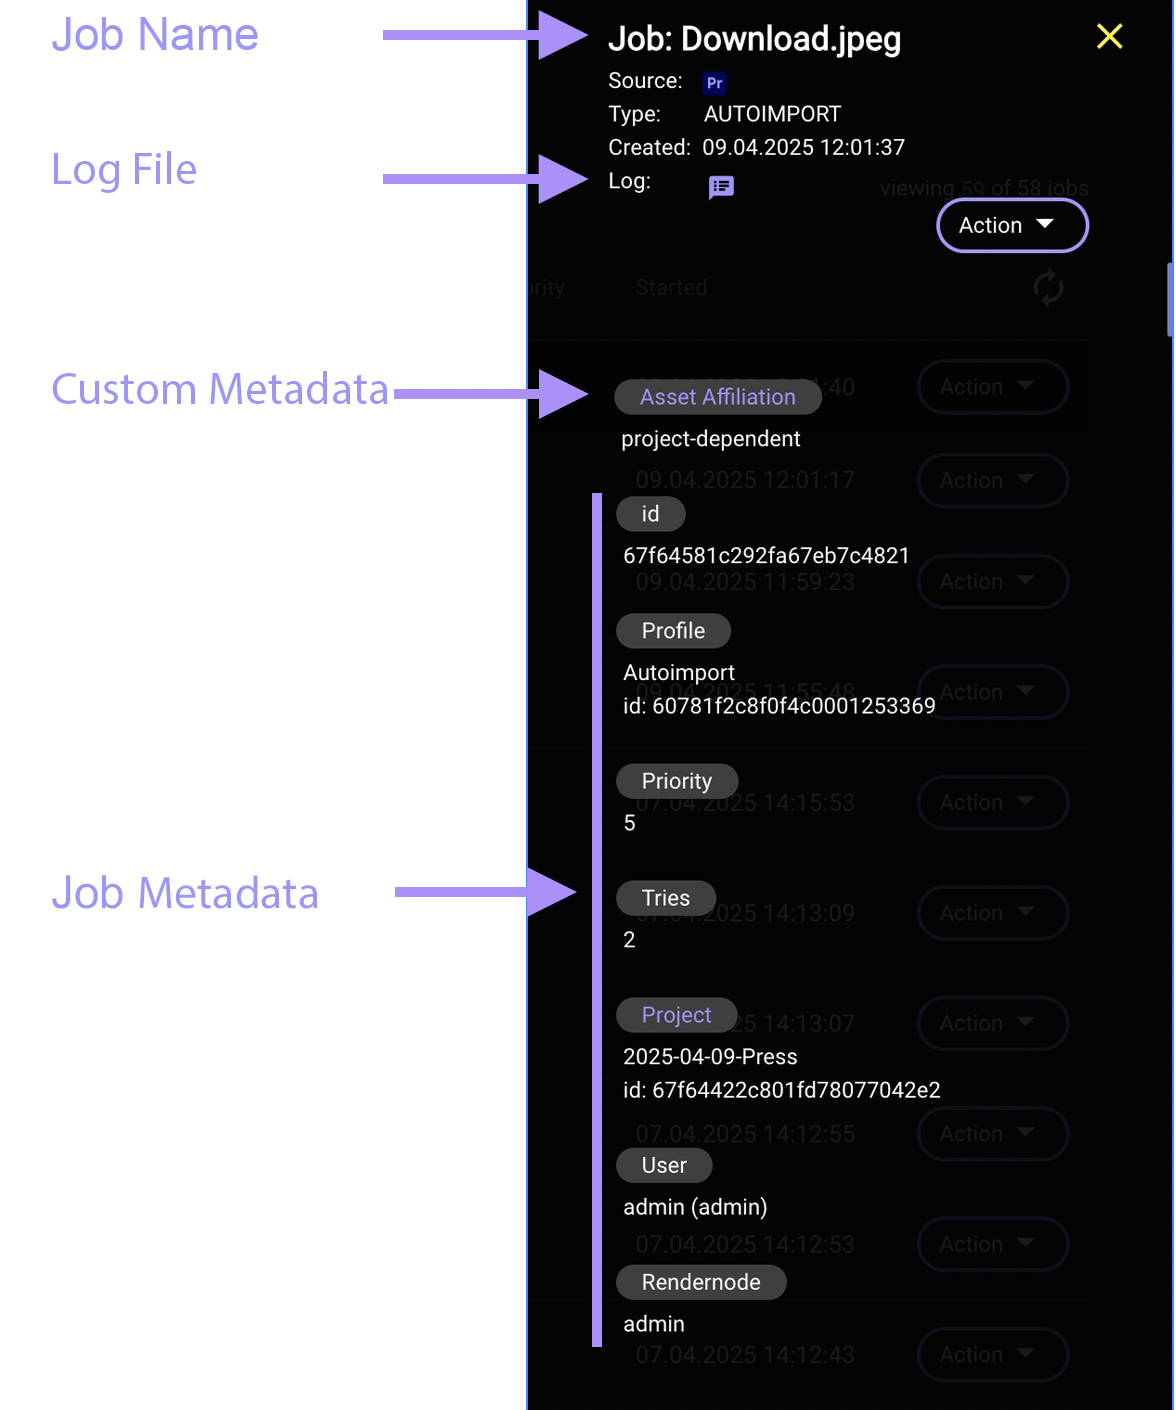
Log File
Indicates the existence of a log file for the job.
Clicking on the symbol opens the stream debugger entry assigned to the job, which contains comprehensive information. The job log is accessible only to users with admin privileges.
Consider reading the documentation on the Split Stream Action node in advance, as a proper configuration is necessary to retrieve a log.
Custom Metadata
This displays the job metadata that has been added to the asset during the ingest process through a Job Metadata Changer Action node.
Clicking on a job metadata field sets a filter bubble in the Dashboard view.
Job Metadata
This section displays asset metadata which has been added by a Metadata Set in the dedicated profile during stream execution or by the reference to the source project.
ID: Displays the Asset ID
Priority: Displays the job priority
Project: Displays the project associated with the asset and its project ID
User: Shows the name of the user who has started the job
Render nodes: Shows the render nodes to which the job was initially assigned
Viewing (the number of available jobs)
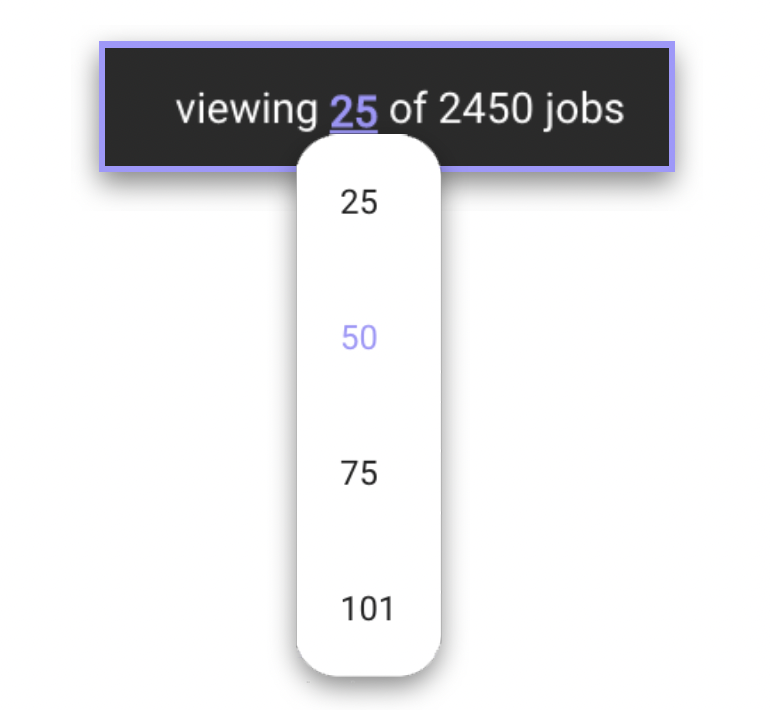
The view numbering indicates the quantity of jobs presented in comparison to the total number of jobs on the dashboard.
The maximum number of jobs shown per page is 25 and can be adjusted by selecting from the options of 25, 50, 75, or 101 elements per page, accessible by clicking on the colored number text.
Consider taking a look at the Job Database Cleanup preference function.
Refresh
If a filter has been applied, only the jobs that were present at the time the filter was applied will be shown in the dashboard. When new jobs are added, they need to be loaded by using the Refresh button.
If the button is pressed while a filter is applied, only the jobs that match the filter criteria will be reloaded.
Action Button
The action button menu on the dashboard offers various functions based on the job's status. This button remains visible even when viewing the job overlay, streamlining the multi-selection of jobs.
The available functions include:
Queued Jobs: When a job is in the queue, various actions can be initiated:
Cancel: This action aborts the queued job, allowing it to be restarted at a later time.
Top Priority: This action sets the priority of the job to 0, making it the highest priority in the queue.
Postpone: This action increases the creation date of the job and moves it to the end of the list.
Delete: This action removes the job from the dashboard permanently. Please note that this action cannot be undone.
Running Jobs:
When a job is running, various actions can be initiated:
Cancel: This action aborts the running job, allowing it to be restarted at a later time.*
Delete: This action removes and cancels the job from the dashboard permanently. Please note that this action cannot be undone.*
Canceled Jobs: When a job is canceled, various actions can be initiated:
Delete: This action removes the job from the dashboard permanently. Please note that this action cannot be undone.
Restart: Canceled jobs can be restarted, maintaining their priority and being added to the list of jobs with the same priority. Their start time will be updated.
Finished Jobs:
When a job is canceled, various actions can be initiated
Delete: This action removes the job from the dashboard permanently. Please note that this action cannot be undone.
Restart: A successful job can be restarted by holding the Alt key while clicking the action menu (this feature is intended solely for development/debugging purposes!).
*As a consequence, none of the subsequent parts of the workflow (nodes) are executed. If a workflow involves, for instance, the "Copy File Action Node" or the "Render in AME Node," the interruption not only halts the process but also closes the associated application. It's important to note that this may not apply universally to all Third-Party applications that are addressed.
Start Date
This displays the start time and date of the job. A job begins as soon as it is accepted by a render node or client.
Priority
This display indicates the priority of a job, as defined in the profiles or set when triggering a profile through the Job Create Job Action node.
The common priority range is from 1 (highest) to 10 (lowest), with Priority 0 representing the highest priority, known as Top Priority.
Creator Name
The display name of the render node or client that created this job is shown.
Job Name
It displays the name and extension of the asset if it serves as the source for the job.
Otherwise, it will show the job name that has been set when creating a job through the Job Create Job Action node.
Joby Type Icon
This displays the executed trigger, which is linked to the Source Type.
Common job types:
IO:
Autoimport
Export
Watchfolder
Panel_Import
Import
CO:
Web_Export
Web_Import
Web:Upload
HK:
Archive
Backup
Consolidate
Delete
Restore
Copy
Move
Source Type Icon
The source type indicates the application or endpoint that triggered this job. The job type (trigger) follows this selection.
Common source types include:
HK
IO
CO
Premiere Pro
After Effects
Audition
Third party
Pagination
This feature enables users to navigate between various job sites. The number of displayed jobs can be customized through the 'Viewing' section.